Table of Contents
Install Debian on a LaCie NAS (Kirkwood based) using the Debian installer
Introduction
This page details step by step how to install a Debian system on a LaCie NAS (Kirkwood based), using the Debian installer. The network-console images allows to perform a completely remote full installation. This means that there is no needs to open the case nor to plug a serial wire.
Note that this howto is only relevant for the LaCie boards supported by the Debian kernel. To check if your board is well supported, please refer this device array. All the Linux mainlined boards are also supported by the Debian kernel.
Configure U-Boot
For more informations about U-Boot on LaCie NASes, please see this page.
Update U-Boot to mainline
As a requirement, you must be able to modify the U-Boot environment. With some of the LaCie stock versions (the oldest), some supposed critical variables (as 'bootcmd') are protected. At boot time, the LaCie U-Boot overrides the environment values with some hard-coded ones. To check that, simply try to set and save the 'bootcmd' variable. After a reset, you must be able to retrieve your changes.
If you are not allowed to configure the environment, you must update U-Boot to the mainline version. Please, refer to this howto.
Setup the U-Boot environment
To run a Debian system, U-Boot must be able to load the files uImage and uInitrd from the /boot partition. Some U-Boot environment variables must be modified. For example, if you intend to store the /boot files into the first partition (default behaviour for the Debian installer), you could run the following commands:
ns2> set diskload "ide reset && ext2load ide 0:1 0x800000 uImage && ext2load ide 0:1 0x1200000 uInitrd"
ns2> set bootcmd "dhcp && run netconsole; if run usbload || run diskload; then bootm 0x800000 0x1200000; fi"
ns2> print diskload bootcmd
diskload=ide reset && ext2load ide 0:1 0x800000 uImage && ext2load ide 0:1 0x1200000 uInitrd
bootcmd=dhcp && run netconsole; if run usbload || run diskload; then bootm 0x800000 0x1200000; fi
ns2> saveenv
Saving Environment to SPI Flash...
Erasing SPI flash...Writing to SPI flash...done
Run the network-console Debian installer
Prepare network-console files
First you must download the network-console files from this Debian FTP repository. Note that that the uInitrd image doesn't include any preseed.cfg file. In our case, preseeding is needed to configure network and SSH server without any human action. For more informations about preseeding, please refer to this wiki page.
To add the preseed.cfg file to the the uInitrd image, you can try the following shell commands:
$ wget http://ftp.nl.debian.org/debian/dists/testing/main/installer-armel/current/images/kirkwood/network-console/lacie/uInitrd
$ dd if=uInitrd of=initrd.gz bs=64 skip=1
$ mkdir initrd; cd initrd
$ gzip -d < ../initrd.gz | cpio --extract --verbose --make-directories --no-absolute-filenames
$ wget ftp://lacie-nas.org/debian-installer/network-installer/preseed.cfg
$ find . | cpio -H newc --create --verbose | gzip -9 > ../initrd.gz
$ cd ..
$ mkimage -A arm -O linux -T ramdisk -C gzip -a "0x0" -e "0x0" -n "ramdisk with preseed.cfg" -d initrd.gz uInitrd
$ rm -rf initrd.gz initrd
Load network-console images
At your convenience, you could load the network-console image over network or from an USB disk. Both methods are described here.
From an USB disk
- Prepare an USB disk or stick: put the network-console files into the first partition (VFAT formatted).
- Plug the USB disk at the front.
- Connect to the U-Boot netconsole and load network-console files with the following commands:
ns2> usb reset
ns2> fatload usb 0:1 0x800000 uImage
ns2> fatload usb 0:1 0x1200000 uInitrd
From network via a TFTP server
- On a you development machine, setup a TFTP server and put the network-console files into the exported directory.
- Connect to the U-Boot netconsole and load network-console files with the following commands (replace $TFTP_SERVER_IP with your TFTP server IP address):
ns2> set serverip $TFTP_SERVER_IP
ns2> tftp 0x800000 debian-installer/kirkwood/network-console/lacie/uImage
Using egiga0 device
TFTP from server 192.168.0.16; our IP address is 192.168.0.15
Filename 'debian-installer/kirkwood/network-console/lacie/uImage'.
Load address: 0x800000
Loading: #################################################################
         #################################################################
         #################################################################
         #################################################################
         ################################################
done
Bytes transferred = 1574768 (180770 hex)
ns2> tftp 0x1200000 debian-installer/kirkwood/network-console/lacie/uInitrd
Using egiga0 device
TFTP from server 192.168.0.16; our IP address is 192.168.0.15
Filename 'debian-installer/kirkwood/network-console/lacie/uInitrd'.
Load address: 0x1200000
Loading: #################################################################
         #################################################################
         #################################################################
         #################################################################
         #################################################################
         #################################################################
         #################################################################
         #################################################################
         #################################################################
         #################################################################
         #################################################################
         #################################################################
         #################################################################
         #################################################################
         ###############################################################
done
Bytes transferred = 4976913 (4bf111 hex)
Boot the Debian network installer
When both images are loaded, the network installer can be booted with 'bootm 0x800000 0x1200000'.
ns2> bootm 0x800000 0x1200000
## Booting kernel from Legacy Image at 00800000 ...
   Image Name:   Debian kernel
   Image Type:   ARM Linux Kernel Image (uncompressed)
   Data Size:    1574704 Bytes = 1.5 MiB
   Load Address: 00008000
   Entry Point:  00008000
   Verifying Checksum ... OK
## Loading init Ramdisk from Legacy Image at 01200000 ...
   Image Name:   debian-installer ramdisk
   Image Type:   ARM Linux RAMDisk Image (gzip compressed)
   Data Size:    4976849 Bytes = 4.7 MiB
   Load Address: 00000000
   Entry Point:  00000000
   Verifying Checksum ... OK
   Loading Kernel Image ... OK
OK

Starting kernel ...
Log into the Debian installer
To log into the Debian installer, you need to guess the NAS IP. This IP should be the same as the one given by the DHCP server to the U-Boot system. To confirm, you can use an utility like dhcpdump:
$ sudo dhcpdump -i eth0
...
OPTION:  50 (  4) Request IP address        192.168.0.15
...
Once the NAS front LED turns red, you should be able to log into the Debian installer. The password is lacie.
$ ssh installer@192.168.0.15
The authenticity of host '192.168.0.15 (192.168.0.15)' can't be established.
RSA key fingerprint is 96:4c:b3:d7:b9:26:5d:da:fa:52:d3:74:69:50:e1:2b.
Are you sure you want to continue connecting (yes/no)? yes
Warning: Permanently added '192.168.0.15' (RSA) to the list of known hosts.
installer@192.168.0.15's password:
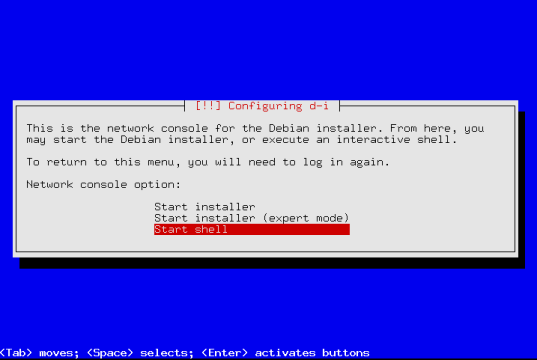
At this point, you should see this screen:
Complete the installation
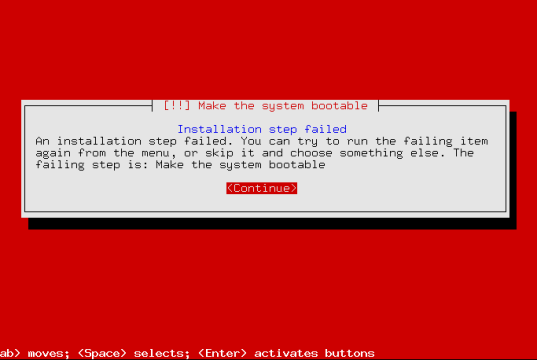
Simply, follow the Debian installer path… IThe installer could fail to make the system bootable, how to solve this is described at the section troubleshooting.
Run the Debian system
- Log into the Debian system via SSH:
~$ ssh root@$NAS_IP
root@192.168.0.15's password:
Linux unassigned-hostname 3.2.0-2-kirkwood #1 Mon Apr 16 12:58:57 UTC 2012 armv5tel

The programs included with the Debian GNU/Linux system are free software;
the exact distribution terms for each program are described in the
individual files in /usr/share/doc/*/copyright.

Debian GNU/Linux comes with ABSOLUTELY NO WARRANTY, to the extent
permitted by applicable law.
Last login: Mon May  7 01:32:59 2012
- For the preseeding purpose, the hostname has been set to 'unassigned-domain'. You may want to change this default hostname. As root, run the following command:
root@unassigned-hostname:~# echo $MY_NAS_NAME > /etc/hostname
Troubleshooting
The system is not bootable
The Debian installer may fail to make the system bootable:
It is because the flash-kernel package is not up to date. You must update this package with the lacie-nas.org version. First, you must exit out of the Debian installer. In the 'Debian installer main menu', select 'Execute a shell'.
- From the installer shell, chroot into the target system:
~ # mount -t proc proc /target/proc/
~ # mount -t sysfs sysfs /target/sys/
~ # chroot /target /bin/bash
- Add the lacie-nas.org Debian repository to the apt source list:
root@unassigned-hostname:/# cat >> /etc/apt/sources.list <<EOF
>
> deb ftp://lacie-nas.org/debian/ sid main
> deb-src ftp://lacie-nas.org/debian/ sid main
> EOF
- Import lacie-nas.org GPK key:
gpg --keyserver pgpkeys.mit.edu --recv-key 0E3D4C9F7C71B58C
gpg -a --export 0E3D4C9F7C71B58C | apt-key add -
- Reinstall the flash-kernel package:
root@unassigned-hostname:/# apt-get update
root@unassigned-hostname:/# apt-get install flash-kernel
Reading package lists... Done
- Install the u-boot-tools package:
root@unassigned-hostname:/# apt-get install u-boot-tools
<note important>The u-boot-tools package installation should have been triggered by the flash-kernel package postinstall scripts. For an unknown reason, it is not the case. To be investigate…</note>
- And finally, reinstall the linux-image package:
root@unassigned-hostname:/# apt-get install --reinstall linux-image-3.2.0-2-kirkwood
...
flash-kernel: installing version 3.2.0-2-kirkwood
Generating kernel u-boot image... done.
Installing new uImage.
Generating initramfs u-boot image... done.
Installing new uInitrd.
- Exit the shell and restart the Debian installer:
root@unassigned-hostname:/# exit
~ # umount /target/sys/
~ # umount /target/proc/
~ # exit
- From the 'Debian installer main menu', select 'Make the system bootable'. Now, this step should succeed.


